Saturday, 23 March 2013

Port Out Starboard Home

Hello and welcome.  I hope that you are having a great weekend.  I have been working on a few things crafty but ended up coming back to this tag I started a couple of days ago.  If you want the in depth on how I got this far check out the previous post. 


This is where I left it on the last post.  As a quick recap I have blended DI Pine Needles, Mowed Lawn, Salty Ocean and Chipped Sapphire and then stamped with white acrylic paint.  The stamp I used is Great Impressions E391.   I started this tag wanting it to be a sea scene which suited the sentiment on the stamp perfectly. 


I stamped the same sentiment on white card using DI Walnut Stain and then tore around it.  I blended Salty Ocean and Mowed Lawn, edged with Walnut Stain and then spritzed with water.  I dried it and then stamped using DI Dusty Concord and the small shell stamp from PaperArtsy Lynne Perrella Collection 001.  These arrived yesterday and I was so keen to try them out.  Fab stamps.  Thanks PaperArtsy.  They also changed this project because my original plan was to do some sort of sinking ship and a lighthouse and something else maybe.  Well, I've still got the lighthouse............


I stamped the Lady With the Ship on her Head.  Mrs Neptune maybe?  I have admired Lynne Perrella's stamps for a long time but these are the first ones I have used.  They are so beautifully detailed and I love the quirky designs.  This one perfectly fitted the sentiment and my theme.   The lighthouse was a sticky rubdown.  My original idea was to use Beadazzle beads but it was too coarse to stick so I used white flock.  This didn't show up against the background so I did a little experiment with Dusty Concord.  I quite like how it looks foggy. 


The tie is a piece of torn cotton fabric coloured with Salty Ocean.  I washed it slightly to react the ink and also so when I screwed it up it would hold the creases.  I dried it till it was damp and then stamped using the small shell stamp again with DI Dusty Concord and then used the True North stamp with Walnut Stain.  I attached it using a polka dot brad.  

I am entering this for 
PaperArtsy - Welcome Back Linda Cain  I was intending to try a different technique as demonstrated by Linda but I haven't got my canvas fnished so I thought I'd share another tag.  The same but different.......

Thanks for visiting.  Take care, keep warm, be crafty.

Thursday, 21 March 2013

Tic Tac Tag

Greeting Friends, Followers, Bloggers.   Well, it's officially spring.   Someone hasn't told the man in charge.  It's cold.  Sunny but cold.  Brrrrrrrr.   Me no likey.  A good excuse to stay in in the warm and craft......

I have become a regular over at the PaperArtsy blog and this week it's Linda Cain who is inspiring us.  Now I know you are going to say 'it's that bird again!!' but to be fair he is so cute and he is very versatile.  Also he's a PaperArtsy stamp and since I am entering their challenge.........  The good news, actually great news, is that I was one of the lucky winners last week and a new set of PaperArtsy stamps is winging it's way so maybe Ding Dong Bird will have to take a back seat.  Then again maybe not.  

So, Linda's been playing with colours and paints and I was very inspired by her use of paint on stamps.  Never tried that before.  Hmmmm

I started with some white gloss card and cut two tags and had a bit left over.  I wasn't going to use that bit just now but I had some ink left over so waste not want not.  I used Distress Ink Salty Ocean, Chipped Sapphire, Broken China, Pine Needles, Mowed Lawn and Picked Raspberry.  I blended these onto the card until they looked nice.  Then I edged the two tags with Walnut Stain.  

 I stamped onto the tags with white acrylic.  I used a brayer to apply the paint and this seemed to work quite well.  I used the TickTock stamp from PaperArtsy SIDD5 on the first tag and Great Impressions E391 on the second.  I'm not saying anything more about the second tag now, but will come back to it at a later date.  

I stamped Ding Dong Bird on to white card and embossed with black embossing powder then cut him out.  I didn't have the fine detail powder that Linda used but that wasn't a problem because the lines on my bird are big and bold.  I liked the way Linda had left some of her pieces white so I decided to try this with the bird.  I stamped him on the tag to give me his legs and then stuck the white embossed image on top.  I like it. 

I went around the edge of the card with a white pen faux stitches and added some wool and a silver starfish.  I am not 100% happy with the wool.   It's not quite right but the colours match.  Maybe it needs a bit more bling.  I shall have to keep my eye open for something suitable.  If you would like to check out Linda's inspiring post it's here.

I am entering this tag for
PaperArtsy - Welcome Back Linda Cain
The Artistic Stamper March Challenge - Tags 
Wow! Embossing Powder - March Anything Goes

Keep warm everyone and lets hope spring is here soon.  Thanks for dropping by. 
 

Monday, 18 March 2013

Looking for the Easter Bunny

Hello Nomad followers and friends.  Hope you all had a crafty good weekend.  I can't believe that next weekend it's Easter.  I know it's middling to early this year but it just doesn't feel quite like spring yet.  It was warmer today but we had a very cold gale blowing.  I stripped the bed, washed the sheets, put them on the line, re-pegged them 6 times!  Dry in half an hour!!  Who needs a tumble drier.   Of course, with the tumble drier there is less chance your laundry will blow away.  Laugh. 

I always think of spring as shades of bright colours, new leaves, new grass, all those spring flowers, lambs jumping, bunnies hopping, that sort of thing.  I am still waiting for the bunnies to hop, definitely no lambs here for a while yet and not much sign of the bright colours either.  Even so I have managed to create a colour riot that maybe will make me feel a bit more springy.  


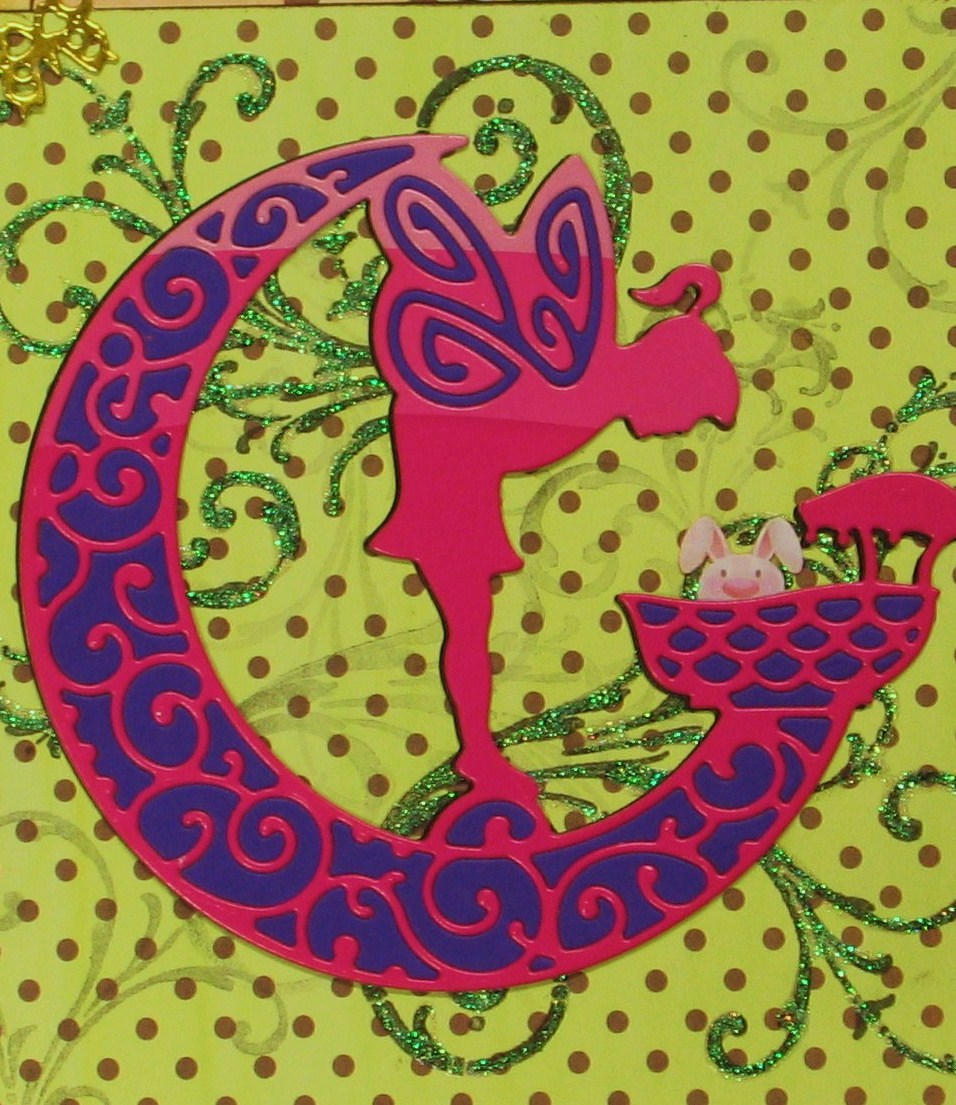
I did say a riot.  I think this is one that some people will like and some people will think I need my brain adjusted.  OK, so there are probably people who think I need my brain adjusted before I made this.  I like it.  Please feel free to comment.  I wanted to make an Easter card for the Cheery Lynn challenge and I knew I wanted to use the Pixie Guardian die which is new for me and I already love it.  It cuts like a dream and there are some very interesting negative shapes.  I had a challenge with my colour scheme.  What do you mean you can see that!!  This wasn't actually where I started but whilst madly cutting anything that I could find, just to see how this die looked in different colours, I found the pink graduated card in the scrap box and thought it looked perfect.  Then I cut the royal purple as well and thought that was nice to.  Then I did a bit of puzzling, putting the purple negative pieces into the pink die cut.  Yeah, really.  I also cut this die in black and stuck it behind slightly out of line to give me a subtle shadow. 

Simon Says Stamp challenge is a sketch and I thought this would work well for my Die cut.  All the papers are from a bumper value pack from the local Nille.  The top layer I stamped with a stamp from Crafty Individuals Floral Flourishes set.  Top left, bottom right I stamped with Memento Tuxedo black and then covered with iridescent glitter glue.  Then I layered it on the brown polka dot paper.  The third layer I cut the corners with Cheery Lynn Love You More die to give a doily effect.  I cut a strip of the stripe paper and stuck it on the LHS as per the sketch.  The two polka dot layers, the broad strip and the edges of the card were all distressed and edged with DI Walnut Stain.  There's a butterfly from Cheery Lynn's mini dimensional butterflies die as well. 


There's me bunny.  I was going to put an Easter Egg in the basket but couldn't find anything I liked the right size.  Then I spotted this little fellow on some baby paper and thought he fitted perfectly.  Something for the Guardian to guard.  

Entering this for 
Cheery Lynn Designs Challenge 71 - Easter
Simon Says Stamps - Choose a sketch I used sketch 1
Dies to Die For Challenge - Spring 

Take care.  Thanks for dropping by. 

Saturday, 16 March 2013

I Will Have a Fishy

Good evening blogmates.  Hope everyone is having a great weekend.  It a bit wild out tonight with some cold winds howling around the house so a good time to craft.  Tomorrow there is a new challenge at The Craft Barn so I decided tonight was a good chance to finish my project for the current one!!  Often near the end of the list I am I am.  

We are playing with the Craft Barn's Alpha Challenge and very popular it is too.  Izzy gave us 'M' this week but restricted it to Ma - Me!!  I already had a fair few personal rules I was playing to so I was a little dismayed.  There goes my Mouse/Mus!  So I had to have a search around for an animal beginning Ma - Me in English and Norwegian.  The internet is a wonderful thing dum de dum de dum......

This evening M is for mackerel/makrell.  I have used a 15x15cm piece of My Minds Eye double sided cardstock which was a pale blue on one side.  I layered with a smaller piece of water print vellum.  Love these printed vellums.  Such strong colours.  

 I drew a pattern for my fish and then cut them out of metal sheets in two shades of blue.  The stripes were doodled using a black permanent marker.  The eyes are cream card candy with a doodled black centre.  

I got my definitions from Wikipeadia.  The letters are die cut using Ida Lou's Flowerbox Sizzix dies.  The bubbles are glossy accents containing a curled slither of the metal sheets.

This photo was taken with a flash.  Love the shimmer on the front fish.  I really must try to craft with photo friendly materials but what's a project without a bit of bling??

Entering this for The Craft Barn Alpha Challenge - M 

Take care, relax, craft on.  Thanks for visiting. 

Where Did I Put My Ding Dong Bird

Hello Nomad Followers and Friends.  I read today that if in doubt go for it.  Excellent advice.  So the fingers are inky again as I have been having a fun and messy time.  Over at PaperArtsy this week Helen Chilton has been showing some wonderful paint techniques.  I was particularly intrigued when she was using the crackly tissue paper and stamped on the back to reverse the image.  Ah ha.  Was looking for ways to reverse stamped images the other day.  So I tracked down my Ding Dong Bird.  Easier said than done!!  The last tidy up was too long ago and there are way to many piles of partly finished ideas and stash lying around.  Maybe I should join one of those sites where you photograph your desk and make everyone breathe a sigh of relief because despite what your significant other says you aren't the only one with a substantial stash and not enough space.   Oop's distracted again.  Back to the craft...


So I stamped the bird from PaperArtsy Ding and Dong SIDD5 onto some crackly tissue paper.  When I turned it over, oh joy, almost as clear that side as well.  Then I applied Distress Inks Salty Ocean, Tattered Shutters, Mowed Lawn and Scattered Straw.  I spritzed with water and my Memento Black I had used to stamp my bird bled!!!  Yelp!!  OK, start again, Distress inks first, spritz, let it dry, stamp Ding Dong Bird.  Glorious.  Helen has been showing some tricks so I painted the back of my tissue paper with white acrylic to make the colours stand out and also to stop any background showing through and muddying my colours.  


Now at this point those of you who are paying attention are going to say 'hang on a minute, you said you were going to reverse the image but Ding Dong Bird always faces that way....'.  How right you are.  In my excitement I painted the acrylic on the back of my tissue instead of the front so you will have to take my word that everything showed through, or just give it a go yourself.  Loads of fun. 


I decided to use my tissue loveliness on a 15x15cm canvas I bought the other day.  I painted it with white acrylic and then while it was still damp splashed on some cobalt blue and deep cobalt violet and some more white.  An acrylic frenzy.  Then I applied the tissue paper and blended the edges with some more acrylic.  I picked three metal embellishments from Korthobby.  One was silver and the other two bronze but I applied some black acrylic paint to give a distressed/antique look.  I stamped the tick-tock from SIDD5 and then felt it needed a few more and well.......  I also added the arrow stamp from the same set.  Some Prima leaves, a flower from the pound shop and edged with lace.  


I have set the canvas inside a deep frame backed with black card.  The frame is 24cm square so I will be able to join in with the Creative Craft World mini kit challenge as well as a few others.  I think it might be art lovey.  

Entering this messy wonder for
PaperArtsy
Crafty-emblies Altered Art Challenge - Wings
Korthobbyutfordring - Mars 3x3 (3 metal pieces, 3 stamps, bird, arrow, tick-tock, 3 embelishments, flower, leaves, lace)
Ranger Ink - Seasonal Palette March
Creative Craft World - Mini Kit Challenge Feb/Mar (frame size 24x24cm)


Hope you all have a great weekend.   Thanks for dropping by.  Your comments are sprinkles of joy.  Take care, keep warm, be crafty.
Thursday, 14 March 2013

Bring on the Clowns....

Hi blog friends.  Another sunny cold day here.  Have been out watching the rabbits and the chickens do their thing and a bit of tidying up, although the real gardening can't start until the ground defrosts.  The grave digger says there is still a meter of frost in the ground!  Winter is very reluctant to give up it's hold but that's not stopping the snowdrops, some of which are in flower, and the crocus are starting to show as well.  Everything is ready.  You can almost feel the expectation in the air.   Here's hoping it's Spring soon.

Have been playing with the Distress Inks again and getting messy.  Green and blue fingers today!  These colours are fabulous to give a Spring feel.  There were a few of challenges which went nicely together so here is today's offering, a postcard....


I started off by making my own mask from a scrap piece of paper.  Please ignore the very lovely raven stamp.  As I said it was a scrap piece of paper.  I wanted to play with Rangers blending technique.  Yes, again!! only I wanted to try circles and stripes.  


Here's my piece of card after applying some Mowed Lawn, Salty Ocean and Tattered Shutters Distress Ink through my mask.  Distressed Circles.  I spritzed with water to give a bit of interest, but after all the other blending and stamping it's not that easy to see. 


Then I blended in some stripes using Mowed Lawn, Salty Ocean and Scattered Straw.  I stamped with Ranger black archival ink using small stamps from Crafty Individuals and Build a Clown from Basic Grey.  The postcard stamp is also Crafty Individuals but I stamped it twice on scrap paper before stamping it here so it gave a more subtle image.   What a strange fellow he is.  He looks like he's ready to spring and with that little propeller I sure he will have added lift.

Entering this for
Artful Times - Spots and Stripes
Basic Grey - Spring is in the Air used Basic Grey Build a Clown stamps
Ranger Ink - Seasonal Palette March

Have a great day everyone.  Thanks for dropping by.  Happy crafting.  

Monday, 11 March 2013

Arrrrrgggggggggg!!

Good morning, good morning.  Well the week is off to a flying start.  Actually, if I must be truthful, and I find that is usually best, I have yet to put my head down cos the craft is upon me.  Starting to feel a bit like I have been staring into bright lights for a long time but the project finally shimmied into place and overall I am a very contented bunny after a bit of a marathon session.  Anyway, there was nothing worth watching on TV and inky fingers are a much more satisfying end to the weekend.  Even if it is technically Monday already.  

Over at Cheery Lynn they wanted us to use doilies.  So I came up with......


After much altering of ideas and deliberation on colour scheme it was Crafty Individuals Travels in Italy papers to the rescue.  I love these collage papers and this particular one is my all time favourite.  I have been working with some wild colours this weekend and I really had the need for a good dose of blue.  I cut two of Cheery Lynn Spring Flower Burst Doily from cream hammered card and coloured them with a mix of Versa Magic Chalk Ink Night Sky, Ocean Depth and Agean Blue.  What dreamy names!  Love the soft matte effect.  I used one doily whole and then cut the other into quarters and used three pieces on the corners.  


The ticket is Darice embossing folder 12" Ticket, embossed onto Core'dinations card and sanded.  There are three tickets on this embossing folder and each has a different number.  I like that touch.  The hearts that are scattered around are some pretty dome stickers I had in my stock.  The bow and adhesive pearls are Papermania.   I backed the whole thing with some black card for a bit of added classiness. 


I really love these chalk inks on the doily.  I think it looks a bit like aged metal.  I haven't zoomed in on my journalling because, just between you and me, my new white paint marker threw a bit of a wobbler and my writing isn't quite up to scratch.  I just wanted to say that this is the ticket to my heart......
Awww, dat romantic.  I think the problem with the marker might have been a little bit due to operator error.  Ah well, tomorrows another day.  Craft away.......

Entering this for
Cheery Lynn Designs Challenge 70 - Doilies 
Simon Says Stamp and Show - By the Numbers 

Thanks so much for dropping by.  Your support and comments are really appreciated.  Be safe, be warm, craft on........