Showing posts with label Lace. Show all posts

Saturday, 24 August 2024

Hip Hip Hippo

Hello Nomad friends.  I love the colorize dies and some of them are big enough to use as cards.  So today I made a beatrice hippo card.  Adorbs.

I added a pretty lace dingsen I have had for ever to her back and a flower button to the side of her mouth.  

Thanks for dropping by.  Hugz

Joining the fun at
Allsorts Challenge Week 795 - Delightful Animals
Pammies Inky Pinkies Challenge 2433


Wednesday, 31 May 2023

May Rudolf Days

Hello Nomad friends.  It's the end of the month again!!  Already??!!  I do like to join Mo's Rudolf Days challenge so I had a rattle through the scraps and stamped images and came up with this cute snowangel snowman by Unity Stamps.

I stamped and embossed with white powder then smudged some blue ink and cut out the circle.  I added a ring of white lace and found a pretty edged scrap of green which I embossed with a confetti embossing folder.  The lovely red tree paper had a hole in it which my topper covered perfectly!  A Lost Coast Designs Happy Christmas stamp and mount on a green card base to finish.  

Thanks for dropping by.  Hugz

Joining the fun at
May Rudolph Days Challenge
Allsorts Challenge Week 730 - Use a Stencil or AG
Snippets Playground Challenge 455
Simon Says Stamp Monday Challenge - Sun, Moon and Stars have moons and stars on the embossed panel
Simon Says Stamp Wednesday Challenge - Anything Goes


Saturday, 26 June 2021

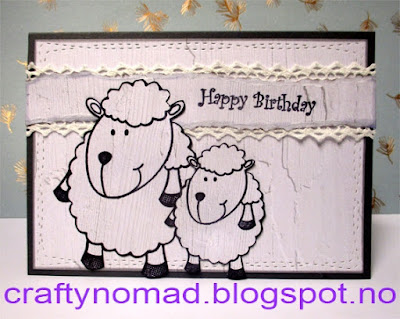
Shabby Sheep

Hello Nomad friends.  The Do-All Kreatives challenge inspired me to dig out this fun animal stamp set from Flonzcraft and stamp some sheeps.

The pun was inspired by a fb challenge that wanted Shabby Chic with ripped paper and lace.  Ohhhhhh!  Chic!!!!  Actually these sheeps aren't too shabby.....   Baaaaaahahaahahaaaaahaaa.  Sorry, someone gave me fizzy wine and I think I may be experiencing a short circuit........ Never did understand shabby chic....
Dark grey base card and everything else is my favourite pale grey woodgrain designer card from Kort og Godt.  Sheeps stamped and fussy cut.  Sentiment panel ripped and mounted on white lace.   Happy Birthday stamp from Lost Coast Designs Party Words set.  

Thanks for dropping by.  Hugz

Joining the fun at
Do-All Kreatives 54 - Gross und Klein
Paperbabe Stamps Challenge 147 - Anything Goes
Allsorts Challenge Week 630 - Use Design Paper
Friendship Challenge 66 - Happy Birthday
Stempelgarten Challenge 105 - Leben auf dem Bauernhof


Friday, 26 March 2021

I Love Eggs

 Hello Nomad friends.  I'm feeling the Easter vibes so I made an egg shaped card with paint and vellum and Rubber Dance stamps.

 
I made the background by brayering red, yellow and ochre acrylic paint onto card.  Then I added some red and black smears using an old credit card.  When the paint was dry I cut an egg shape using a die.  All my stamping is black archival on yellow vellum.  I stamped the Vintage Script on some pieces of yellow vellum I cut with a grass die, to give a nice jagged edge.  I stamped the sentiment on another piece of the yellow vellum and ripped the edges.  I stamped the girl from This is Me on yellow vellum and fussy her face.  I used pritstick to glue the vellum pieces to the 'egg'.  I edged the egg with orange Promarker then used a yellow Promarker to colour some lace and stuck that around the edge.  I found an MDF winged key, a daisy and a spikey flower and added them to the card.


I used the same die to cut a card base, setting the fold of my card about 1cm below the top edge of the die.  I glued my card panel to the base and cut a bit off the bottom backside to stop my egg from rolling all over the place.

 
This was a really fun card to make.
 Don't forget to check out the Rubber Dance blog where the team are sharing masses of awesome inspiration every day, and also the Rubber Dance webshop, where there are a selection of stamps on special offer.
 
Thanks for dropping by.  Hugz 


Wednesday, 10 February 2021

Squashed Love

Hello Nomad friends.  It's the 10th of the month and time for a new Let's Squash It! challenge!!!!  We have our December Empress Joanne helping us out with awesome inspiration for our Love and Red theme.  You must use a love themed embossing folder, one with hearts, words of love, cupids.  Does anyone have a cupid embossing folder????  You must also use the colour Red and/or Pink.  Here's a card I made using two Sizzix border folders; Hearts and Forever & Always.


I started by embossing the top and the bottom of a red card panel with the Hearts border embossing folders.  Then I placed the Always & Forever folder in the middle and embossed that.  I know, I should have done the one in the middle first!!  I thought the edges of the words folder might flatten my hearts, but luckily it didn't.  And my positioning isn't bad.  But I will do the middle first next time!!  Or at least second LOL.  I smeared the embossed areas with Cactus Flower pink ink for a tone on tone look.   I actually think this would have been fine as a card, just mount it on a base and done!

 
I decided to make it a bit more complex by running a piece of lace around the panel and then mounting it on a red card base.  Gives it a bit more dimension and a bit of a vintage feel, but I think I actually prefer it without the lace.  Maybe that's my Clean and Simple side.  What do you think??  With or without??


Grab your love themed folders and join the Let's Squash It! fun.   It doesn't have to be a valentines card.  I think this one would stretch to a wedding.  Or maybe you have a New Baby folder with hearts on it, or words including the word love?  As long as you use an embossing folder with hearts and/or a definite love theme then it's good with us.  And Red/Pink!

Thanks for dropping by.  Hop over to Let's Squash It! to see the amazing inspiration cards from Jo and Joanne and the linky.  See you there.  Hugz


Sunday, 8 November 2020

Found and Used

Hello Nomad friends.  I found a Hunkydory paper pack that came in a magazine.  I actually bought this mag for the embossing folder so I hadn't opened the paper pack.  So I did.   Oooh, pretty, and perfect for a friend of mine with health issues who loves the garden.  So I decided to make a set of cards.   Here's two I made from one of the A4 printed card sheets.

For the one on the left I cut a third off the sheet and added it to a pink DL card base.  I added a piece of lace down the RHS and added one of the small die cut printed sentiments.  The card on the right I folded the remainder of the printed sheet in half to make a DL card.  I added one of the printed borders top and bottom and added some more of the lace.  Then I used the large oval panel and a smaller oval sentiment panel.  Sweet!!!

Thanks for dropping by.  Hugz

Joining the fun at
Creative Crafting Uncles 10 - Males Go Feminine
Allsorts Challenge Week 597 - Lace, Real or Faux

Monday, 21 September 2020

For Her

Hello Nomad friends.  In Norway nearly everyone gets confirmed when they are 15.  It's the thing to do, and quite a big thing it is too.  Because of the C-19 all of this was put on hold in May/June and it's all happening this month instead.   I wanted to make some simple confirmation cards.  They are often quite elaborate, but sometimes less is more, or at least enough.


I used Kort og Godt designer paper which has the words Konfirmant printed all over it.  The gold label is also from a Kort og Godt designer sheet that I cut out and edged with purple.


I used a Prima JN Doll, stamped on white card, coloured with Promarkers and fussy cut.  I stamped her dress on some white and gold patterned handmade paper, fussy cut, and pieced it back in.  I added some lace around the neck and sleeves.  
 
Thanks for dropping by.  Hugz
 
Joining the fun at

Monday, 20 July 2020

Tweet Christmas Wishes

Hello Nomad friends.  It's CHRISTMAS!!!!!!   Well, Christmas in July at least.  I have decided to hark back to the past when things took time and people bothered to roast chestnuts over open fires!!  A bird in a top hat in vintage style seem to fit the bill......


The base panel is some cool designer paper.  I stamped Lost Coast Designs Megan's Christmas Bird and coloured with red, green and purple Promarkers, white and glittery gold gel pens and distress markers.  

Hop over to the Lost Coast Portal to Creativity for all the details and masses of Christmas fun and inspiration.  Link up your stamped Christmas projects for a chance to win!!

Thanks for dropping by.  Stay safe, keep well.  Hugz

Joining the fun at
Frilly and Funkie - Christmas Cards in July
Time Out Challenge 166 - Peaceful
Promarker Challenge Week 551 Animal Antics
Christmas Kickstart Challenge 33 - Hatty Christmas 
Simon Says Stamp Wednesday Challenge - For A Child
Crafty Hazelnut's Christmas Challenge 499


Monday, 13 April 2020

Christmas Canvas

Hello Nomad friends.  I'm sharing this christmas hanging canvas using Aztec Paints I made for the Colourcraft feature in the December Craft Stamper magazine.  Lots of details over at the Colourcraft blog.


Thanks for dropping by.  Hugz

Friday, 14 December 2018

December Sparkle Blends Release Blog Hop

Hello.  Welcome.  This month I am guest designing for Doodles Paper Playground and I am so happy to be hopping with the team for the new release, so welcome to the December Release Blog Hop!  You should be coming from Annie.  There are 6 new blends to share with you and I can't wait to see more of what the team has to share with us all!  
Here's my project.  I made a shaker tag!


Sqquueeee!  How cute is that??  Penguins on frozen pond!!  Aren't they adorbs??  And so much sparkly loveliness!!


I started by making my Shaker element.  I cut a piece of patterned paper, a piece of acetate, a piece of foam and a piece of white card with Sizzix Rounded Tags dies.  Then I cut the foam and the white card with Poppystamps House in the Woods die.  It gives this lovely tree lined aperture, but alas, once again, the house had to go!!  I water coloured the white card to give me my scene.  The foam I cut away all the branches and tree trunks except the biggest ones on each side.  This has allowed me to make a three part shaker.  I filled the two outside shaker spaces with Icicle blend, removing some of the bigger elements, and used Juniper Berries blend for the middle shaker window.  I also stamped the penguins' skates and the Rubber Dance sentiment with black archival.
Here you can see a bit more of the blends in the shaker windows.  I stamped, embossed and fussy cut the penguins from Poppystamps Love Note set.  Stamping their skates on the tag means I didn't have to fussy cut them!!  Then I went a little crazy with the iridescent glitter glue on the penguins, the tree branches, the sentiment and also used it to add detail to the trees. 
To see detailed descriptions of each of the December Sparkle Blends release, check out the release blog post
We are so excited about this whole release! Do you have a favorite? Juniper Berries, Celebrate and Garnet seem to be front runners for our Designing Divas! These talented ladies have lots of inspiring projects for you, so please hop along with us and leave comments on each leg for a chance to win one of 4 great prizes!
Grand Prize: One person who comments on all posts will win full size packages of all 6 of our December Release Sparkle Blends!
3 Door Prizes: 3 randomly selected commenters will receive one full size package of Sparkle Blends from the December Release!
Giveaway closes at 11:59pm, EST, Sunday December 16, 2018
~~~~~~~~~~~~~~~
Thanks for dropping by.  Don't forget to leave a comment for a chance to win and now you need to hop to Kelli.  If you get lost or find a broken link the full hop list is at the Doodles Paper Playground.  Hugz

Joining the fun at
Poppystamps Challenge 51 - Merry and Bright
Kreativ Scrapping Utfordring 12 - Lag Pa Lag Jul
Visions of Sugarplums Challenge 1 - Christmas/Winter
The Cats Pajamas Challenge #352 - Winter Holidays
Simon Says Stamp Wednesday Challenge - Christmas


Sunday, 23 September 2018

Bllama

Hello.  Welcome.  About 10 years ago I nearly bought myself an alpaca.  Yes, a real alpaca.  But it never happened, which is probably a good thing.  I would have just paid for someone else to keep it and probably only visited once a year, so where's the fun in that??!  But, many years on, I still love alpacas and llamas and this card was a delight to make.  


I am really pleased with how this turned out.  I did some fancy die cutting to get my flowery frame, and I wasn't sure it would work, but it actually came out almost exactly how I saw it in my head!  Way to go Mr Mojo!!


I cut a square of pale blue card.  I used Hero Arts Paper Layering Swirl Flower die and partially cut it into the corners by using a small cutting plate.  This is a two part die.  The flower petals only partially cut and then there is an 'angel wing' die to cut the outline.


Then I used a craft knife to cut between the flower to leave a thin frame.  I lifted the petals and shaped them slightly and coloured with turquoise and dark blue chalk.    Then I forgot to take more step by step photo's..........


I found some flowery lace and coloured it with Tumbled Glass distress ink and added it along the top and bottom inside edge of the frame.  I stamped Hero Arts Word Pops stamp using Salty Ocean DOx on blue card for a bit of tone on tone texture and backed the flower frame.  I cut the flower centers again, layered them up and added some half pearls.  I stamped Hero Arts Llama with dark blue ink, fussy cut and coloured with Stormy Sky distess ink.  This stamp set comes with a die but it leaves a white border that I am not used to, and I like fussy cutting.  I added a small ribbon bow, also coloured with the Tumbled Glass ink.  Then I stamped the sentiment from the llama set and also 29 Again, which is a Rubber Dance stamp, with the dark blue ink and mounted the panel on a steel blue base.  

Thanks for dropping by.  Hugz

Joining the fun at
A Blog Named Hero Challenge - Monochromatic
Allsorts Challenge Week 486 - Water or Blue
The Twisted Challenge 4 - Celebrations + Monochrome
Dare 2 B Artzy Challenge - Your Favorite Color  I love blue!!
Papirlosjen #9 - Blonder og Band


Saturday, 22 September 2018

Deer Santa

Hello.  Welcome.  Finally got around to inking up Dylusions Heads and Tails deer stamp and made a christmas tag.


I started with a kraft tag and stamped the deer with black archival and masked.  Then I used Memory Box Modern Sprinkles stencil and Salty Ocean DOx above the deer and Picked Raspberry DOx at the bottom of the tag.  I cut a hat using Sizzix Crazy Things accessories dies from red and white card and added iridescent glitter glue.  I also added it to the pink area.  In the right light it looks like this.......


Bling!!!!!  I used some lovely cream lace for the tag tie and added a wooden button.


I stamped the Rubber Dance sentiment on a piece of patterned tape and embossed with black powder.  That was a fun way to add a sentiment.  I used some white gel pen and Promarkers to add a bit of detail to the deer.  

Thanks for dropping by.  Hugz

Joining the fun at
Frilly and Funkie Challenge - All Creatures Great and Small
Memory Box Challenge 41 - Tape Too
Addicted to Stamps Challenge #166 - Christmas Comes Early
Simon Says Stamp Wednesday Challenge - Bling It On
Stamplorations Summer Mixed Media Challenge
Stamplorations Summer Tagplorations Challenge


Sunday, 10 June 2018

The One That Got Away

Hello.  Welcome.  For my birthday I received lots and lots of handmade cards from my crafty friends all around the world, so big HUGZ to everyone who sent me happy mail.  Some of these had little gifts as well and this lovely You Lift Me Up Flopsey stamp came winging it's way in from my friend Janis.  Hi Janis.  This is an MFT stamp, so I hopped over to see what fun was to be found on their blog.  They have a colour challenge and a weekly sketch, so I did this..........


I stamped the bunny on some rose patterned paper, fussy cut a bit round his ear and balloons and cut my tag with Stamplorations medium luggage tag die. I coloured the bunny with Dried Marigold distress ink and the balloons with blue Promarkers.  The bunny worked fine, but the background colours made the balloon colours look muddy, so I stamped the balloons on a scrap of white card, coloured, fussy cut and stuck them on.  I was going to put the tag on a circle patterned background, but it didn't look right so I had this idea to use the same rose paper!  I lined up the tag to match the background pattern and cut the panel with Simon Says Stamp stitched rectangle die.  I used some blue scraps for the sentiment banner using the 'for you' from the bunny set and mounted on a blue base card.  It looked a bit bare so I added a bit of natural colour lace and a balloon brad with a bit of cotton attached.  

Thanks for dropping by.  Hugz

Joining the fun at
MFT Sketch Challenge 388
MFT Colour Challenge 94
Die Cut Divas Challenge - Animals or Pets
Pixies Snippets Playground Challenge 328
Simon Says Stamp Monday Challenge - All Things Bright and Beautiful