Showing posts with label Tea Bag. Show all posts

Wednesday, 27 March 2024

It's Penguining To Look A Lot Like Cake Time

Hello Nomad friends.  Lots of Easter fun going on with some of the Norwegian groups and one of them wants a birthday card with an non-traditional birthday stamp.  So I decided to go with penguins, like you do.  Everyone loves penguins!   Why relegate them to Christmas!!   Especially when they have cake and chocolate tea!!!!!

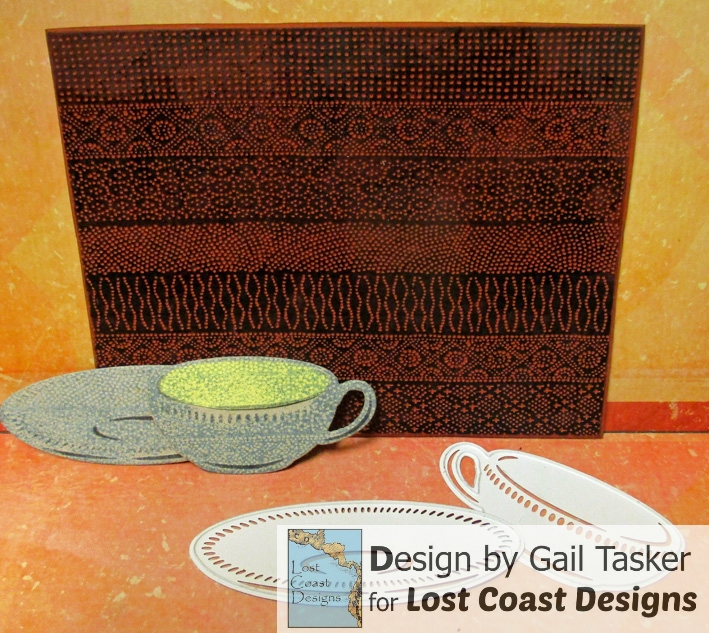
I cut my card base from a piece of fancy edge bazzill.  I decided the large scallops were fun and added a mid green layer.  Then I embossed a piece of cream card with Darice birthday embossing folder and liberally smeared with Twisted Citron distress ink.  I cut an ATC, dusted with emerald and lime green brusho powder and spritzed with water.  When it was dry I embossed it with the same folder, added the magical birthday stamped panel and that cute penguin, stamped, coloured and fussy cut.  I added the atc to the centre of the card and a couple of stamped, coloured and fussy cut Poppystamp Love Note penguins as additional support at the bottom.

 Open sesame!!!  Why sesame???  Anyway, I digress.........
Inside we have a pocket made with an offcut of the bazzill scallop edge card, more Poppystamp penguins and the guy in the middle is fetching the cake!!!   I grounded the penguins on some grass die cut from some green card with gold paint splatts.  The penguins are coloured with Promarkers.  The tea is chocolate and very tasty............

Thanks for dropping by.  Hugz

Joining the fun at
Poppystamps Challenge 114 - Mixed Media Mash-Up used distress ink, paint, brusho's and Promarkers
Simon Says Stamp Monday Challenge - Emboss It
Simon Says Stamp Wednesday Challenge - Anything Goes
Die Cut Divas Challenge - AG


Tuesday, 29 December 2020

Virtual Scrap - Day 3

Hello Nomad friends.  The final few hours of the virtual scrap are upon me and I am really pleased with the projects I have made.  The challenges have been fun and inspiring and, despite hoping to join in with them all, I have not compromised quality for quantity.   But as I say, still a few hours to go so maybe........   I'm back to Christmas again.......

We made some of these cute little tea/giftcard holders yesterday as part of a quick challenge.  They are really quick and easy and fun.  I made two yesterday and thought I'd make another one today with a winter theme.  The paper is very old Imaginisce and the snowman is Marianne Designs.  He's just sitting in there.  You can pull him out and play with him, or write on him.  I thought he made a cute tag!

I didn't have any cocoa sachets, so for illustration purposes I added a tea bag.  You can add some more on the inside and I added a extra little decorative bar with printed circles from another piece of Imaginisce designer paper.  Think this will bring joy, and the one at the far end is a cocoa filled cup.  

Joining the fun at
Unstampabelles Challenge 107 - Joy
I Love Math Challenge 18 - Winter/Christmas
circles, triangles and much measuring and folding
Country View Challenge December - Anything Christmas
Paperminutes 672 - Christmas card or goodie


I made a quick little tag using the same Making Memories Poinsettia Flocked Mistletoe paper I used for my coffee cup last night.  Love those little flocked flowers.  The stamp is from Kort og Godt and says Christmas Hug.  Sweet!!

Joining the fun at
Double D Challenge - Poinsettia
Crafty Hazelnut's Christmas Challenge 522


And last but by no means least, this cute Kort og Godt dog, this time the Christmas with antlers version.  Awesomely cute!!  I stamped the dog with black archival, masked and then stamped the snowflakes and sentiment with blue archival.  I added a little distress marker colour to the dog and done.  Next years Christmas card?????   Maybe.....

Dog is joining the fun at
Scrappelyst Grublis for Desember - Snø
Christmas Kickstart Challenge 45 - Anything Chrismassy


Thanks for dropping by.  I'm gonna put something in the oven to slow cook and then back to my little crafty space.  Hugz


Saturday, 5 September 2020

Double Pocket Card and New Techniques

Hello Nomad friends.  I saw a lovely pocket card over at Liz' blog.  She used a 5x7 card base, but I decided to try with a DL card (20 x 10,5) and give it a twist.  Running before I can walk!!   This is a sure recipe for lots of time spent fixing things I never saw coming.  But, at the end, I must say I am really pleased with the resulting card, although I will do things differently if I do this again.  Probably when I do it again, cos it's an easy fold and a very pretty result.

Because I made two pockets in a DL size card they are actually not much use for anything.  I did have visions of sticking a teabag in each of them, but they are too small.  On a brighter note, they are very pretty in the real.


I used a cream base.  I cut the front panel in two and then scored each section from the top corners to bottom middle.  Snag #1: scored like this square panels won't fold over each other to make the pocket.  I solved the problem by measuring up 2,5cm from the bottom on each side of each panel and cutting to the middle score.  So each small panel is now a downward pointing pentagon shape.  Still with me??????
 

Using patterned paper cover the inside of the card with a rectangular piece and the pocket triangles with triangular pieces.  I left a little border to 'frame' the patterned paper.  I used Marianne Designs Eline's Woodland Christmas papers.  I wanted autumn colours and thought this pattern was suitably not-too-xmas.  Fold the pocket panels over and stick.  Snag #2: the two pockets are very waggly.  On a 5x7 card one pocket gives a nice solid front.  Two pockets on a slimline card, not so much.  What I suggest you do now is glue the two pockets to the back panel to turn it into a card front, and add another panel or card base to the back to make your card.  But, I didn't do that!!! 


I added another piece of the patterned paper between the two pockets and then backed it and the pockets panels with a piece of cream card.  Ta da.  Where's me chocolate.........

I cut Marianne Designs tea cup and saucer from silver mirror card and coloured with yellow and orange promarkers.  Takes a little time to dry but looks nice and metalllic still.  I used Marianne Designs Pinebough die and yellow card x3 to put under the cup.   I cut two Marianne Designs Scandanavian Stars from the same pattern paper and slid them into the pockets.

Inside I added a stitch diecut pale orange panel and used Marianne Designs stamp and matching die on Bazzill Bling orange card.

A couple of teabags and it's ready to go.  Choco tea of course.......

Thanks for sticking with me through this mega post.  Or not maybe.  Hugz

Joining the fun at
Marianne Design Challenge 254 PB7044, CR1238, LR0187, LR0126, COL1320
Scrappesyken September - Yellow/Red/Orange
Double D Challenge - Colorful
Nordsalten Hobbyklubb 187 - Geometriske Former
Let's Craft and Create Challenge 163


Friday, 23 August 2019

Tea Cup Pocket

Hello.  Welcome.  I made a cute pocket card using this lovely tea cup and saucer die from Marianne Designs.


I cut the frame and tea cup from silver mirror card.  Then I used two Marianne Design patterned papers for the mat and inside the frame.  The flower was cut from silver mirror card and blue patterned paper and layered.  I added a silver sticker in the flower center and the sentiment is a silver sticker.


I only glued the cup and saucer where it touched the frame so I could add a teabag.
Choco tea of course!!

Thanks for dropping by.  Hugz

Joining the fun at
Marianne Design Challenge 230 CR1238, LR0129, LR0141, PK9121
Unstampabelles Challenge 92 - Tea in the Garden
Nordsalten Hobbyklubb Utfordring 174 - Lag Pa Lag
Crafty Hazelnut's Patterned Paper August Challenge

Monday, 15 April 2019

Pixie Tea

Hello Nomad fans.  Gosh, busy here today!  I must have bus syndrome.  You know, never one when you want one and then three arrive at once.  Anyway, it's the 15th so time for a new challenge at the Lost Coast Portal to Creativity and this time the theme is On Wings She Flies.  We want to see your stamped makes featuring winged females.  I decided to use the sweet Tee Hee Hard Luck Pixie and a tea cup die cut from Marianne Designs.


Hmmm, tea!!  Bliss for me.  Being British I have a distinct weakness for a lovely cup of tea.  Loved when Lost Coast Designs released this cute tea bag carrying pixie.


I started by making the tea cup.  I die cut it from some greyboard ex-packaging.  I masked the inside of the cup and then stamped with Lost Coast Designs Yourba Adire background stamp and Stormy Sky distress ink. 


I made a card base from some patterned paper and stamped Tee Hee on it using black archival.  That gives me all the little details I don't want to fussy cut.  Then I stamped again on a scrap of white card and coloured with distress inks.  She's got Worn Lipstick socks, Peeled Paint trousers, Stormy Sky shirt, Mowed Lawn hair and a Rusty Hinge tea bag.  I gave her wings a very pale Stormy Sky wash and added some glitter.  Then I fussy cut her, the tea bag and tea tag.


I stuck everything on the card base, tucking the tea tag behind the cup cos I do dislike a soggy tea tag!!  I added a few black pen details to make it look like the tea bag is causing ripples.  Oh yeah, I used Rusty Hinge for the tea in the cup as well.  Then I finished by stamping the Carmen's Veranda clear stamp word Bliss.  Hmmm, tea!!  

Thanks for dropping by.  Link up your stamped winged females for a chance to win Lost Coast dollars.  Remember, the more players the bigger the prize!!

A pot of Keemun tea has been brewing whilst I've been typing so me and my tea are going out in the garden to enjoy the sunshine.  Hugz

Joining the fun at

Monday, 8 June 2015

To Two Too

Hello  Welcome.  Yesterday I was asked about my Altered Playing Card deck and had to sheepishly admit that I still had 6 cards (and Jokers) to complete.  So I picked one of Claudine's posts that I had bookmarked as unfinished.  You can see Claudine's cards HERE


Week 22 Claudine added elmer glue to her cards.  I used wood glue and two shades of green Dylusion sprays.  The card on the right I had squiggled the glue and it really shows up with the Jade spray.  On the left I somehow managed to get lots of little bubbles which actually are nicely highlighted by the green spray.


I added some cool washi tape I bought at IKEA the other day.  The markings are green and perfectly matched my background.  I also did some stamping with a tiny, but very cool Prima stamp.  


Looks a bit like a summer picnic.  The tea service and tea bag are all Viva Las Vegas stamps.  They actually come on wheels but I cut them off during the fussy cutting.  The circles are Sizzix swirl embosslit die.  The words are also Sizzix dies.  I cut them black but they vanished a little against the tape so I added some white pen.  


I've used the same tea themed stamps and Wheeley Winged Cat from Viva Las Vegas stamps.  The cat lost his wheels as well, but retained his crown.  I added some bits of the same washi tape and more Sizzix letters.  The film strip is also a sizzix die and I added small London themed pictures from a Crafty Individuals image book. 


Joining the fun at
Simon Says Stamp Monday Challenge - Royal
Summer Coffee Lovers Blog Hop
VLVS June Challenge 
Domino Art Challenge 14 - Any Theme, Any Game 
Stamping Sensations June Challenge - Dies and Punches 

Thanks for your visit.  Hugz

Tuesday, 28 October 2014

Tea Anyone?

Hello.  Welcome.  Nearly the end of the month again!!  Where does the time go.  I've had my Die-Namites dies on my desk for a few days hoping for inspiration to strike so I can join in with their sketch and dare challenge.  Then Mark's Finest Papers wants a teabag holder.  Now as a dedicated tea drinker how could I resist?  Then there's the Simon Says Stamp Wednesday Challenge, which wants Kraft and closes tomorrow, without me having an entry in sight!!   And they all came together like this....


I used a piece of printed kraft for my base and added some black archival around the edge, and an extra few smears.   I cut two Die-Namites Windy Wheat die from kraft card and added some chocolate ink.  The burlap is a piece Kay sent me that I have been hoarding.  Thanks Kay.  Hugz.  The little tea bag pocket was a free gift with an order from Unity Stamp Co.  I stamped the sentiment, masked it, and stamped the image from Crafty Individuals Tea Tree stamp set.  I added some strands from the burlap and a maple leaf brad to the tea pocket.  I have simplified the sketch and thought it needed a little more so I used the sentiment stamp to go around the edge of the card.


Here's a close up of the tea pocket.  I decided to keep with the colour scheme and added a chocolate tea bag to my tea pocket.  This one doesn't have a little string so I added a burlap thread loop.  

Joining the fun at
Die-Namites October Challenge - Die, Sketch and Dare
Speedy Fox and Friends Challenge 235 - Tea Bag Holder
Simon Says Stamp Wednesday Challenge - Use Kraft
Rubber Dance October Colour Challenge - Vintage Tones
Simon Says Stamp Monday Challenge - Treats

Thanks for your visit.  Off to make quince jelly.  Hugz