Wednesday, 31 July 2013

For the Love of Pink

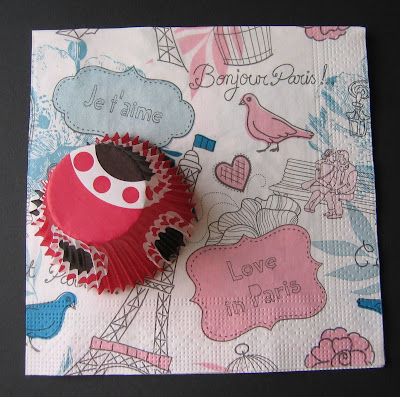
Hi blog followers and friends.  Welcome to my little bit of blogland on this, the last day of July.  Where is the year going??  Zooommmm.....   It has been too long since my last post.  Not quite sure what happened there because there are a lot of projects I'm working on but I don't seem to have got things finished and posted.  6/10, must try harder.  Anyway, something finally came together and it's for the LOTV and Eclectic Paperie challenges.  Now I have been wanting to join in with the EP challenges for a while because they have such lovely themes but this is the first time I have got it together. Over at LOTV it's pretty in pink and Eclectic Paperie wanted us to make a collage using paper from the kitchen!!   The first thing that came to mind was kitchen roll but after a little hunt through the drawers I found these two contenders.  


I have a few lonely napkins left over from when the pack is almost finished.  This one is Paris themed and pink so ideal for the LOTV challenge.  The other item is a cupcake case from IKEA.  They do some funky colours and although it had never occurred to me to use them for art it worked out quite well.  I can see a collection of funky cupcake cases joining the stash....


So I split the three layers of my napkin, glued it to pink cardstock to get a pink tint and added this lovely pair of young and in loves.  These have been cut from LOTV True Love art pad and mounted on sticky pads.  Such a cute pair.  


I cut the cupcake case into strips and made a double rosette.  I added a Papermania pink ribbon brad and an organza bow.  The hearts are from Tando Creative Hearts Minis that I coloured using Pebeo English Red Fantasy Prisme.  


Joining the fun at
LOTV Challenge - Pretty in Pink
Eclectic Paperie - Use Kitchen Paper  

Thanks for dropping by.  Have a great day. 
Thursday, 25 July 2013

A Very Special Lamb

Hello, hello, blog followers and friends.  Yesterday I got happy mail which worked fabulously with a layout I was putting together for the Imaginisce Challenge.  


This is the sketch for the July challenge.  


This is what I came up with.  I remember this day quite vividly.  The sheep and I were up the mountain.  I was working.  He was enjoying himself.  I always got the impression he was on holiday which was why the Imaginisce Travel Stacker Stickers seemed perfect for this layout.  It was a lovely sunny day, late May, hot and hazy.  I remember seeing this view and asking him to jump on this rock, which he did, and then asking him to stay there while I walked far enough away to photo this glorious scene.  Amazingly he did stay put.  I think he knew home was down the hill and since I was going up the hill to take my photo he knew I would be coming back.

I used Imaginisce Animal Crackers Step Right Up double sided paper as my base 002798.  I was kicking myself a bit cos the other side is full with circus themed tickets, which was why I bought it, but this side was perfect for the layout.  I thought the little triangles looked like a pine forest.  The main picture is the one I took which I had made into postcards.  The image is printed in black and white on the reverse side and I thought it was nice to use the repeat image under the colour one.  It also gives me my Sibbe at Work May 2011 caption.  


I used Imaginisce Travel Stacker stickers 003387, the postcard, the tourist first class tag, cos he was a first class tourist, and the customs declaration, which was a great place for my title and also a bit of journalling about Sibbe.  I added some twine to the tags.  


I really wanted to use my i-Top tool but didn't think brads would fit in.  Then I decided to use the 34mm brad punch for this great spiky shape and some of the packaging from other stacker stickers which had the same triangle design.  This gave me my arrows and I used some other elements from the stacker stickers to add some interest.  The trees are cut using Memorybox Frosted Christmas Tree die.  This was my happy mail!  It's one of their newly released dies that I was lucky enough to win as part of the Memorybox Holiday Release over at A Crear Se Dijo.  Fantastic die.  I cut and embossed some green card and then used DI Mowed Lawn to highlight the embossing.  They fitted perfectly to continue my Norwegian forest theme.  The flourish is Sizzix Flowers and Vine #3.  

For this layout, for my memories of this day and my Lamb in general these papers and embellishments couldn't have been more perfect.  I haven't done many layouts but I am really pleased how all the elements work together to give me a very special frozen moment.  I suppose that is what it's all about.......

Joining the fun at
Imaginisce - July Challenge
Country View Challenges - Summer Sizzler
Stamping Sensations July Challenge 

Thanks for dropping by.  Please leave a comment to let me know you passed this way.  Have a great day. 

Wednesday, 24 July 2013

Little Sailor

Hi everyone.  Glad you could join me.  Just a quick post for a cute little card. 


I do so love those Leane Creatief owl decoupage.  I've used the little sailor owl with his cute little boat.  The card is embossed with Sizzix Cracked embossing folder and then coloured with DI Salty Ocean.  I've added the die cut birthday sentiment on top of a Korthobby silver metal embellishment.  A cute card for your little sailor. 

Joining the fun at
Korthobby - Bryllup eller Bursdag
Simon Says Stamp Monday Challenge

Thanks for dropping by.  Hope the heat isn't keeping you from the craft room.   

Sunday, 21 July 2013

Queen of the Universe

Good morning blog friends and followers and a very happy sunny Sunday to you.  So why am I sitting indoors crafting??  Taking advantage of a cool breeze that's blowing and funneling it in to my very warm crafty place.  Definitely feeling like a desert nomad at the moment!!   It's Sunday so of course it's my last minute dash to get my PaperArtsy project finished.  Carol Quance has been inspiring us this week and I wanted to try everything, so I have a few things on half, and then ran out of time and have to choose one thing to finish.  So this is it.....my version of Carol's acetate card


I stamped modern girl from PaperArtsy LPC022 onto my inky background using colorbox Plumeria chalk.  It is new and very juicy so I stamped her again without reinking.  Two for the price of one!  I cut the image out, distressed the edges, mounted on black and then on my second inky background.
 
I tested my acetate to check it wouldn't just melt then used Sizzix Flowers and Vine #3 to cut my flowers, and also the green flourish.  I shaped my flowers, coloured with Raisin, Caramel and Ginger alcohol ink and decided to use a little pearl brad to mount them on the card.  The swirls frame her face and suggested a round cut so I got a bit fussy and then mounted on green textured card from docrafts, tinted with Brilliance Galaxy Gold and some gold outline stickers.  My acetate was a bit thin to make a card from and also had a bit of a tint to it.  Will have to try and find some a bit heavier weight.    

Joining the fun at
PaperArtsy
Simon Says Stamp Monday Challenge - Green
The Artistic Stamper - Ladies Day
Paula Holifield Crafts - Die-ing For It

Have a great Sunday.  Thanks for dropping by.  Off to enjoy the sun.......

Saturday, 20 July 2013

The Crocodile Ate the Clock

Hi everyone.  Hope you are enjoying the sun and the heat.  If you have it.  I know much of the UK is gently cooking and now it's reached us here in Norway.  Time to go for a dip in the fjord one feels.  Just a quick post for a quick card.  Over at Stampoutique this week Gez wants us to keep it CAS so here's a quick birthday card. 


I made the card from Bazzill Bling, not sure of the colour name, it a yellow.  That bling sure gives the photographic team a challenge!!  I've used DI Mowed Lawn to stamp Stampoutique's Rabbit which I cut out and mounted on sticky pads.  The tick tock is from PaperArtsy SIDD5 set and the happy birthday is a Stamposaurus cling.  I think Rabbit looks a little wild cos he can hear that crocodile a coming.....

Joining the fun at
Stampotique Designers Challenge 109 - CAS
Simon Says Stamp Monday Challenge - Green 

Have a fun evening everyone.  Thanks for dropping by.

Sunday, 14 July 2013

Quill, Ink and Pocket Watch

Good morning blog friends.  This is the post I thought I might get done yesterday but Say La Doo Da as usual things got busy.   Working on the PaperArtsy Challenge where this week France has been sharing her techniques.  I decided to work on a tissue tag which she cut up and sewed back together.  Why?  I don't know.  I think it's all part of the art.  I though it's a bit like patchwork lets give it a go.....


I decided I wanted a large tag so I cut a piece of card and coloured my tissue and stuck it down.  Then overpainted and knocked the colour back with a baby wipe.  Great technique.  It exposed some of the underlying colour but also added some shading to the top colour.  Then I used Tando Ink Splatters mask and a couple of shades of blue and tried the bump technique.  I still don't quite got that but it looked OK.  Not on this photo in case you are squinting to see it........


I brayered my stamps from LPCoo1 and SIDD5 with white acrylic, cut up my tag and sewed it back together.  I like the stitch detail, and the sewing machine played along!!  Wonders never cease.  I'm not sure I would actually go to the bother of cutting it up next time but I will definitely use stitching again.  It all in the spirit of live and learn....   I pinned two tickets onto my tag using staples and then added a pocket watch I had painted as per Tim for a Timmy Tag that never was.  I decided I wanted a chain and since it was quite long used it as the tag tie as well. 

Joining the fun at
PaperArtsy
Simon Says Stamp Challenge - Pin it

Have a great Sunday everyone.  Hope you get to do something you really enjoy.  Thanks for droppping by

Saturday, 13 July 2013

Rain Means Craft

Hello everyone.  Welcome to another ramble round the desert.  It's a bit of a grey day so that means CRAFT!!!  Isn't it strange.  Rain and grey days use to be just yuk.  Now it's something to look forward to !!  It's all just a state of mind.  

I have been working on a couple of projects so hopefully I will get them both finished today.  Maybe a double post day!!  Over at Cheery Lynn they were looking for stitches, faux or real, on your project.  Now you may or may not have picked up that me and the sewing machine have a bit of a love hate relationship.  I did play with the idea making something with fabric but my attempts have come to naught.  Didn't even get as far as plugging the machine in!  It will definitely be making an appearance on my next post, if it feels like co-operating today, but here I have gone mostly faux with a summery type card. 


I used green tartan paper from Craft Creations and mounted it on a gold base card.  I cut a circle of gold card then used Cheery Lynn English Tea Party Doily to cut two doilies from handmade paper in yellow and orange and one from gold card.  The handmade paper is quite thick and has an almost felt feel to it.  I layered these, the gold doily I used just the center.  In the middle I have some paper that I embossed with Do Crafts Mixed Buttons folder and then tinted with some brown ink.  The topiary cat and the flowers are from Do Crafts Grown and Sown stamp set.  The corner flourish with the bird is Crafty Individuals Victoria Corner.  I added some faux stitching around the edge and also stitched on my bow.  

Joining the fun at
Cheery Lynn Designs - In Stitches
A Little Bit Crafty - Die-ing For It
Country View Challenges - Summer Sizzler
Hjerteboden Utfordring 7 - Sol, Sommer, Ferie

Thanks for dropping by.  Hope you have a great Saturday.  May see you again later......... 

Wednesday, 10 July 2013

A Little Bird Told Me

Good Morning Followers, Friends, Bloggers.  It's a lovely sunny day here in Norway and warm so out in the garden I should be but I just wanted to do a quick post just to keep us entertained.  Me as well!!  This is a bit CAS using some delighful chip stickers from Basic Grey.   


I have been quietly following Joan's Garden for a while but this is my first time for joining in with the challenge.  It's a weekly challenge and there is usually a recipe to follow which can make it quite interesting.  This week it was plain background, double oval, a sentiment and at least two colours.   I had these lovely Urban Prairie Chip Stickers from Basic Grey.  I used white hammered card for my background, a flower flourish and bird chippy, mostly pink.  I cut two ovals using Spellbinders dies and distressed and coloured the edges with Distress Ink Picked Raspberry.  Then I spritzed them heavily with water and had a cup of tea.  This let the ink diffuse nicely into the card.  I dried and then stamped my sentiment in Picked Raspberry.

Joining the fun at
Joan's Garden - Challenge
Basic Grey Challenges - No Stamped Images
Bunny Zoes Crafts - Pink and White
Simon Says Stamp and Show - A Little Stamping

Thanks for visiting.  Have a great day.  Hope the sun is shining for you, wherever you are. 

Sunday, 7 July 2013

All at Sea

Hi followers and friends.  A special hello to my new followers.  Welcome again to my little bit of blogland.  Managed to get a good bit of weeding done last night so hoping to get some more plants in place today.  The weather isn't so good, looks like rain, but that's OK.  

Over at PaperArtsy Sue Carrington has been sharing some amazing projects.   I have started my tag screen as well but it's not finished so I am going to share a project inspired by Sue's post using fabric


I have never done tie die so this was a new one on me but I followed Sue's instructions and ended up with this.  Quite pleased with the mottled effect.  


I stamped one of the ladies from LPC001 in black, masked her and then stamped a selection of small stamps from SIDD5, LPC001 and LPC022 in Colourbox Arctic Deep Chalk.  New medium I wanted to try.  Didn't know if it would work but it seems OK.  Nice colour on the fabric.


I didn't have a precut mount like Sue used and thought I would like to mount this onto something.  I cut a piece of card from a box and stuck my fabric to it.  I embossed around the edge with gold embossing powder, spritzed with gold glimmer mist and added some buttons.  Then for the background......  I tried a few things including some bits left from past projects but my little picture seemed to get a bit lost.  So I went CAS.....


This frame is not quite right and a little bit big but I'm working with what I have on a Sunday morning.  What do you think??  The card I backed it with is textured but that doesn't really show in the picture.

Joining the fun at
PaperArtsy
Simon Says Stamp and Show - Anything Goes
Stampotique Designers Challenge 107 - Recycle It (cardboard packing and frame are recycled)
The Artistic Stamper - Ladies Day

Thanks for joining me.  Hope you have a fun, relaxing, creative Sunday.  Please choose the most appropriate.  Thanks for your support and taking the time to visit and comment.  I really do appreciate it.  Lots. 

Saturday, 6 July 2013

Purple and Silver

Hi everybody.  Glad you could join me.  Glad I could join you!  I think I shall just shove last week in the bin and move on.  Problems with the livestock and no time to craft.  No time for anything but the livestock and running to catch up with everything else.  Starting to think I need to stick with vegetables.  I mean how much trouble is a pumpkin?  I know, don't go there..........

I saw a post from Mark over at The Artistic Stamper and he said he often knew where he was going with a project before he started.  When I get the chance I will comment and tell him how lucky he is!!  Maybe that's what makes a great designer.   I admit I have my Eureka moments but often when I have an idea the colours don't work or more often than not I end up somewhere totally different.  Not bad different, just different.  I have been working on Christmas cards.  I know it's July but Cheery Lynn wanted Xmas this week and it also fits in nicely with Beat the Christmas Rush which I have been playing along with for a few months now.  This may look simple, and I admit the second and third ones were quick and easy, but the first one took me longer than I will admit, especially longer than I will admit to myself!  So if you like it and feel inspired that's fine, and a compliment, just send me a little love.  


I wanted to go a bit non-traditional with purple and silver.  I cut my silver base card with the angel wing from Cheery Lynn Spring Flower Burst Doily.  Then I cut a matching doily from purple patterned card and a white snowflake using CLD Snowflake 2.  I attached these using a silver snowflake brad.  The bottom of the card was embossed using Crafts-Too Elk folder and I added some silver snowflake stickers.  The tag, a bit hard to see but it says Yuletide Greetings, was a peel off sticker which I backed with a circle of the same purple card and then attached with a mini brad.   


This is what the card looks like opened up flat.  The base card is only 1cm wider than the angel wing so there is only a small area of hinge but it works fine.  I was worried there wouldn't be enough hinge to keep it standing but no problem.  

Over at BtCR the challenge is for up to 5 cards a month.  I only had three of the stickers to make the tags but I decided since I had thrashed out the design I would make all three now, or never.......  That gives me a running total of 20.  These are interactive cards.  The only things I used to attach were the brads, no glue here today, so if after all the christmas pudding is finished and there's nothing on TV you could sit and turn the doily round and round and round and zzzzzzzzzzzz....... 

Joining the fun at

Thanks for dropping by.  Take care and have a great weekend.  Off to enjoy some late evening sun and do a little weeding.........

Monday, 1 July 2013

Baby Shower

Hi Followers, Friends, Bloggers All.  Welcome to Crafty Nomad Land where I wobble around trying to be...  well, crafty.  Sometimes I even succeed!   Just like a toothless budgie.  Sorry, a bad graffiti joke that just stuck to the brain cell and has out now and again.  You know, it's been a funny old day.  I asked my man what day it was and he said Wednesday.  You're thinking about it aren't you?  I said OK, then later, after realising it probably wasn't Wednesday, suggested to him that most people thought it was Sunday today.  To which he replied "well I knew it was one of those with day in it"!!!!   Is this helpful or is this helpful!!  

Over at Altered Pages the challenge this month was Baby Doll.  Now, OK, I admit it, I'm not really a doll person.  Never have been, probably never will be, but I realise a lot of people, mostly women, although we don't want to be sexist, really like dolls.  Luckily Altered Pages supplied a collage sheet for inspiration and I have been applying the brain cell to the challenge, throwing some ideas around, playing with different elements.  Now the end of the month is nigh and I had to get it together.  Actually quite pleased with the finished project and I may even be persuaded of the value of dolls.  But that's what it's about isn't it?  Doing something that maybe you wouldn't choose to do normally.  Getting out of the comfort zone and trying something new.  Learning.  So, too much waffle tonight, on with the craft......


 I almost forgot to take this picture but luckily I remembered more is more before I started sticking things down!  I have used a Tando Creative Round Printer Tray.  I embossed some card with Sizzix Bingo embossing folder then added some texture paste through some Black Punchinella.  Then I splashed around with various shades of brown and orange acrylic and then added some VersaMagic Perfect Plumeria ink.  I coloured the frame with Burnt Sienna and perfect plumeria.  It gave a nice cherry wood look.  


I added a baby doll from Altered Pages Collage Sheet 3025 Dolly to Love.  I stuck her to card before cutting her out to give a bit more strength.  The banner is from Tando Creative, coloured with various pastel shades and then I have stuck part of a Glitz Cashmere Dame paper garland from Altered Pages onto it.  The buttons are from a grab bag.  The nappy pins were blue plastic but I sprayed them with silver paint.  The little umbrella is from the same grab bag.  It is the perfect colour and size for my baby doll.  The A,B,C,1,2,3 were cut using Sizzix Ducky Wucky alphabet and tinted with the same ink. 


These printer trays come with a little stand so I have painted it to match the frame and painted the two hearts red, of course.  I think this will make a lovely gift for someone expecting, a new mum or a doll lover.  I know one of those!!  

Joining the fun at
Altered Pages - Baby Doll
Tando Creative - Numbers
Simon Says Stamp - Anything Goes

Thanks for dropping by.   Be safe. be crafty......